 |
  |
|
|
|
First
make a new image. I used 150 * 50 pixels - transparent background. |
||
|
Now go to channels - new channel (click the arrow - fig. 1), and name the channel "shadow".
Now choose the Rectangular Marquee Tool and make a selection a bit smaller than your image. Flood fill the selection with white. Deselect. Now go to Filter - Blur
- Gaussian Blur - and to really get rid of the edges I entered 9
pixels.
|
||
|
Go
to layers and and select the shadow layer. Load your channel called
"shadow" (Select - Load selection - shadow). Now choose
black as foreground colour and white as background colour. |
||
| Make
a new selection with the Rectangular Marquee Tool - fig. 3. Make a new channel - call it button, and flood fill the selection with white and deselect. Now go to Filter - Blur - Gaussian Blur - 4 pixels. Then we have to sharpen the edges: Image - adjust - Levels - and drag the arrows towards the center until you have a sharp image)
|
||
| Go
back to Layers and choose the button layer. Now load the button selection
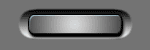
(Select - Load Selection - Button). Now set grey as your foreground colour and black as your background colour, and apply the Radial Gradient Tool. Gradient: Foreground to background. Hold down the Shift key and start the gradient from the center of the button and stop 5-6 pixels outside the button. Your image should now look like fig. 4.
I only used a lighter grey for the rigth button to show you how you can change the apperance with different colours on the button...
|
||
| Now
it's time to apply some bevel and emboss and a bit drop shadow to
make the button pop out a little. Go to Layer - Effects - and enter the values in fig. 5 and 6.
To add some more contrast
to the button I added some Outer glow with these settings:
Finished :-) |
||
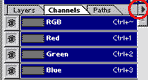 Fig. 1
 Fig. 2
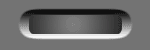
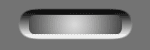 Fig. 4.
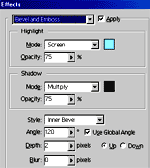 Fig. 5
 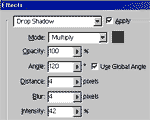 Fig. 6
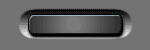
Only permitted Images and Material may be downloaded from this web site.