 |
Open a new image,
240 x 70 pixels, transparent background.
Make a new layer, call it Pipe.
Now select the Linear
Gradient Tool.
If you don't have a chrome gradient you can download mine. 
Just click on the gradient image...
(To install the gradient click on the Linear Gradient Tool
- in the Linear Gradient Options choose Edit. Now click on the
Load button and choose my gradient).
Be sure you have white as your foreground colour and black as
your background colour.
Your Linear Gradient Options window
should now look like fig. 1.
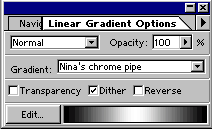 Figure 1
|
 |
Now it's time to fill
your selection with the gradient.
Hold down the Shift-key - Start 1-2 pixels above the selection,
left-click and drag down until you are 1-2 pixels below the
selection. See fig. 2.
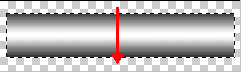 Figure 2
Deselect (Ctrl + D).
|
 |
Make
a new layer and make a selection similar to fig. 3 using the Rectangular
Marquee Tool.
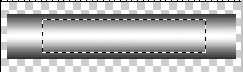 Figure 3
|
 |
Now go to channels and
click on the Create new channel icon  . .
Be sure white is your foreground colour and fill your selection
using the Paint Bucket Tool (fig. 4). Deselect
(Ctrl + D).
 Figure 4
|
 |
Go
to Filter - Blur - Gaussian Blur - 6,0 (fig. 5)
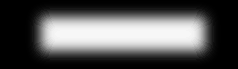 Figure 5
|
 |
Now
go to Image - Adjust - Leves - and drag the arrows towards the center
until you have a sharp image. In fig. 6 you see the values I used.
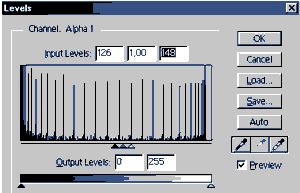 Figure 6
|
 |
Your image should now
look like fig. 7
 Figure 7
|
| |
|
|
|


