 |
  |
|
|
|
Start with opening a new image, 300 x 300 pixels, transparent background. Select the Rectangular Marquee (dobbel click the rectangular marquee to open the marquee options - it's on the upper right side on your screen - see fig. 1).
Change style from Normal
to fixed size, and enter Width: 400 and Heigth 20. |
|
| Now select the Linear
Gradient Tool. If you don't have a chrome gradient you can download mine. Just click on the gradient image... (To install the gradient click on the Linear Gradient Tool - in the Linear Gradient Options choose Edit. Now click on the Load button and choose my gradient). Be sure you have white as your foreground colour and black as your background colour. Your Linear Gradient Options window should now look like fig. 2.
|
|
| Now it's time to fill
your selection with the gradient. Hold down the Shift-key - Start 1-2 pixels above the selection, left-click the mouse and hold and drag down until you are 1-2 pixels below the selection. See fig. 3.
Now we have to center
the pipe vertically. |
|
| Now it's time to add
some details. Open up a new image - width = 2 pixels and heigth = 50 pixels. Select the Single Column Marquee
Tool. Place the selection on the left side of your image.
Now select all - Edit
- Define Pattern. |
|
|
Back on our first image
:-) Select the Paint Bucket and change the Contents from Foreground to Pattern in the Paint Buckets Options window. Fill your selection. Deselect. Your image should now look like fig. 5.
|
|
| Now to the fun part. First we have to merge the pipe layer and the pattern layer. Go to Layer - Merge Visible. Now we are going to bend some pipes
:-)
|
|
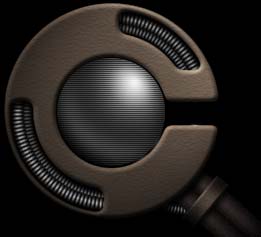
| Now you can insert the
pipes on your designs. Here you see my example :-)
|
|
|Home| |PShop tutorials| |Free Sets| |About me| |Links| |Forum| |E-mail|
Only permitted Images and Material may be downloaded from this web site.