 |
  |
|
|
| Make
a new image - 100 x 100 pixels - transparent background. Create a new layer. Have white as your foreground- and black as your background colour. Create a circle with the Elliptical Marquee Tool (hold down the shift-key when making the selection to create a perfect circle). Now select the Radial Gradient Tool, and fill the selection like shown in fig. 1.
|
||
| Your
image should now look like fig. 2.
Your sphere is now finished. You just deselect and add some background colour on the very first layer. Or - you could spice the whole thing up a bit !
|
||
| Want
that cool chrome look on your sphere? Well - it's pretty easy once
you learned how :-)
To
get the desired effect choose Image - Adjust - Curves - and insert
the values like shown i fig. 3.
|
||
| Your
sphere should now look like fig, 4.
|
||
| Deselect
and add some backround colour and you have a really cool shiny sphere
:-) To my image I also added a Hue/Saturation adjustment layer to colorize the sphere.
|
||
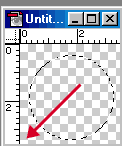 Figure 1
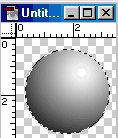 Figure 2
 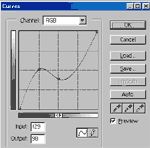 Fig. 3
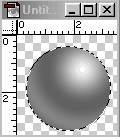 Figure 4
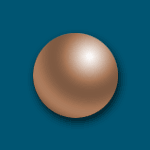
©
Copyright Nina Indset Andersen 2000 - 2003. All rights reserved.
Only permitted Images and Material may be downloaded from this web site.
Only permitted Images and Material may be downloaded from this web site.