 |
  |
|
|
|
|
||
 Fig.
1 Fig.
1 |
Start
by opening a new image (mine is 500 x 170 pixels) and select the
Type Tool and type the desired word. Be sure you use large letters
for the effect to turn out right - you can always minimize it later...
(Font used: Yellow Submarine - 200 pt) Keep your selection and go to Channels.
|
|
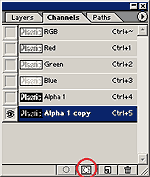 |
Now click the "Save selection as channel" button, and then drag the Alpha 1 layer down to the Create new layer tab to duplicate it. Now
we have to blur things up a bit. Now
go back to Layers.
|
|
|
Select the layer called "text" and go to Filter - Render - Lightning effects - and use the setting shown in fig. 4.
|
||
 Fig.
5 Fig.
5 |
Still
keep your selection and go to Select
- Modify - Contract - 1 pixel. Now it's time to deselect (Ctrl + D). Now drag this layer down to the Create a new layer tab to duplicate it. Call this layer Plastic wrap.
|
|
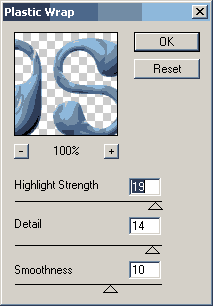 Fig. 6 |
Now go to Filter - Artistic - Plastic Wrap and enter the values shown in figure 6. Now duplicate this layer. On the Plastic Wrap copy layer change the layer mode from Normal to Overlay. |
|
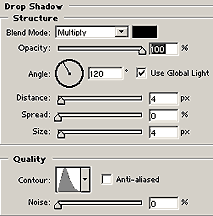 Fig. 7 |
Go back to the Plastic Wrap layer and add a nice drop shadow with the values shown in fig. 7. Your image should now look like final result image at the top of the page. Want
more? Well
- keep on reading... |
|
|
Activate
the Plastic Wrap layer and go to Layer - New Adjustment Layer
- Hue/Saturation and check the Group with previous layer option
- OK. Remember
the very first text layer we made? Hit Ctrl + left click the original
text layer. Select the Rectangular Marquee Tool and use the arrow
keys to move the selection 4 pixels to the right and 4 pixels
down. Then hit Ctrl + Shift + left click the original text layer
again. Now you shall have the text layer + the shadow area selected. The
last thing you have to do is to add a nice drop shadow effect
and you're done!
|
||
 Final
result!
Final
result!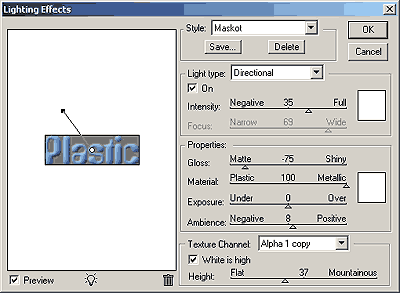 Fig. 4
 Fig.
8
Fig.
8
Only permitted Images and Material may be downloaded from this web site.