 |
  |
|
|
 Figure 1 |
Not all of
us have those great plug-in filters, and here I'll show you how to
make some realistic chrome effect. Ready? First of all you'll have to start off by making a new image. I made a new file, 350 x 350 pixels (we'll minimize the image at the end...), transparent backround, RGB mode. With this tutorial it's very important
to make the letters really big, and then minimize the text when
you are finished to get the full effect! |
|
 Figure 2 |
Start by typing your text. Fill your selection with grey #5959595. |
|
 Figure 3 |
Now make a darker grey your foreground color (#262626) and keep your selection. Now go to Edit - Stroke - |
|
 Figure 4 |
Make a new layer - call it white
shadow. Now go to Select - Modify - Contract - 15 pixels. Fill your
selection with white color. Press down Ctrl and left-click the "Chrome" layer to select it. |
|
 Figure 5 |
Now go to channels Your image should now look like fig. 5. Keep your selection. |
|
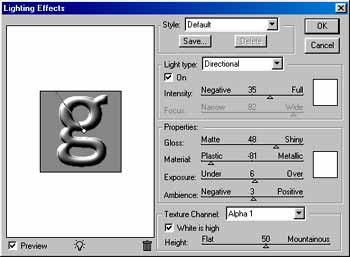 Figure 6 |
Now go back
to layers and select the "Chrome" layer. Now
do a Filter - Render - Lightning Effects with the settings shown in
fig. 6. (OOPS! The Texture Channel is supposed to be Alpha 1 copy - not Alpha 1 as shown in the picture). |
|
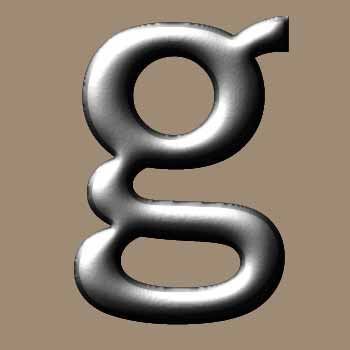 Figure 7 |
Your image
should now look like figure 7 and still be selected. As you can see the edges are a little bit "jaggy", so now it's time to get rid of those... |
|
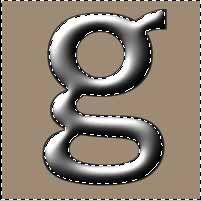 Figure 8 |
Still at
the "Chrome" layer hit Ctrl + Shift + I to inverse the selection. Now go to Select - Modify - Expand - 1 pixel. Hit the Delete key and deselect. Resize your image to 200 x 200 pixels. Now all the fun begins :=)
|
|
 Figure 9 |
Go to Layer
- New - Adjustment Layer. Type: Curves. Be sure to check the Group With Previous Layer box. |
|
 Figure 10 |
Now it's
important that you enter exactly the same value as shown in fig. 10
to get the right result!
If you want your text to look like really shiny plastic you can now go here. If you want to continue this tutorial just read on :=) |
|
 Figure 11 |
We are going
to make the text shine even more, so we'll add a new adjustment layer.
Select the "Chrome" layer again and go to Layer - New - Adjustment Layer - Curves + Group with previous layer. Now enter the values shown in fig. 11 to get the right effect. |
|
 Final result! |
Now your
text is finished and should look like fig. 1 !
To my image I added a rusty texture as background and added some Hue/Saturation to
the Chrome layer with these settings: |
|
Only permitted Images and Material may be downloaded from this web site.